Image: ShutterStock
Do you remember how good it felt to touch the paint with your bare hands and use it to create wall art? We bring you awe-amazing and easy thumb and finger painting ideas for kids of all ages.
Well, it is now time to pass the creativity to your little ones and let them create magic with their messy hands and their imagination. Join them in their holiday art adventure with these amazing finger and thumb painting activities for kids. We guarantee you’ll want to throw away all the paintbrushes.
Key Pointers
- Finger painting allows the kids to express themselves creatively.
- It provides kids with a sensory experience, allowing them to better appreciate the paint’s texture, color, and scent.
- Finger painting can help develop finger strength, hand-eye coordination, and fine motor abilities.
- It will also encourage children to be creative and bring their ideas to reality.
21 Coolest Finger Painting Ideas For Kids
We have selected some of the easiest and fun to work on finger painting and thumb print painting ideas for kids of all ages. These ideas are so much fun, that even you would want to try them out with your kids.
1. Winter tree
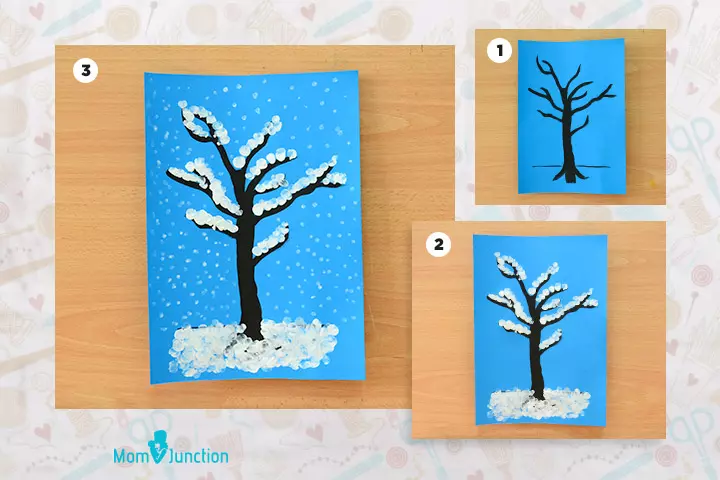
Capture the magic of snow and winter on paper with this easy drawing of the winter tree. Draw this on a blue color paper, which you can also turn into a Christmas or New Year’s greeting card. With a little help from you, even your younger kids aged five or less can create this masterpiece.
You will need:
- Sheet of blue drawing or chart paper
- White finger paint (non-toxic)
- Black marker or sketch
How to:
- Cut the blue sheet into a rectangle and fold it to make it look like a greeting card.
- On the cover of the card, draw the outline of the tree as shown in Image 1. Older kids should be able to do it on their own. Younger ones might need a little help on this one.
- Dip the index finger lightly in the paint and add snow on the branches, as shown in Image 2.
- Use a q-tip (cotton ear bud) to add tiny white flecks around the tree for snowfall.
Write the message inside, and your cute greeting card is ready!
 Quick fact
2. Fingerprint dandelion card
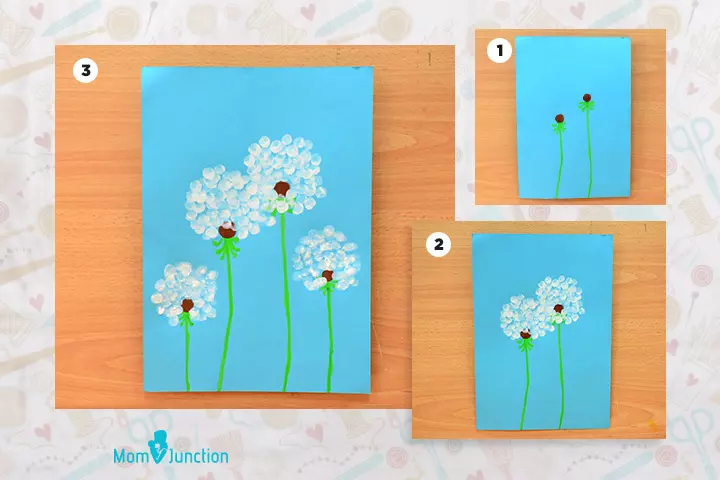
Playing with dandelions can be fun. Painting them can be exciting too. This simple drawing of a bunch of dandelions can be put on homemade greeting cards too.
You will need:
- Green, brown, and white acrylic or non-toxic paints
- Blue chart paper or drawing paper
- A small paintbrush
- A sketch pen
How to:
- Fold the blue rectangular paper in half, for the greeting card.
- Start by drawing two green lines using the paintbrush. Add the flower head with the green paint and then a small circle over it in brown, to complete the center of the dandelion.
- Using the tip of the index finger, add white finger prints around the center of the flower to finish the dandelion.
- Add text of your choice to the greeting card to complete it.
3. Autumn tree
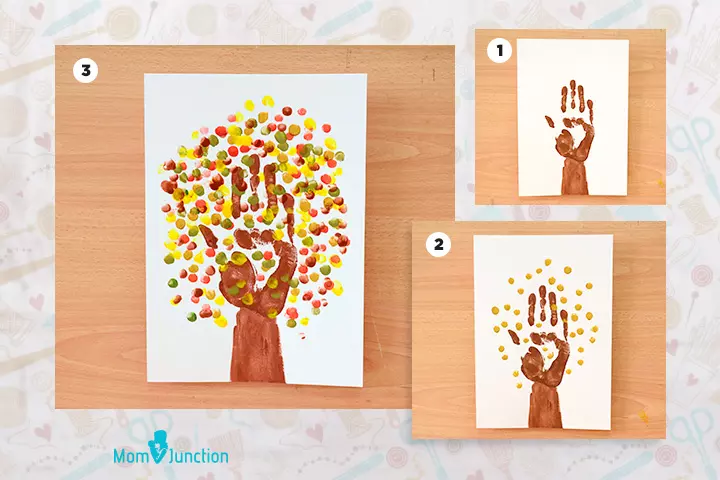
This is an unusual autumn tree that you can draw without using any paintbrushes, except your hands and fingers!
You will need:
- A rectangular Styrofoam container, as long as your child’s arm
- Acrylic or non-toxic paints – brown, orange, green, yellow, and red
- A white sheet of paper
How to:
- Start by snipping one of the smaller edges of the Styrofoam container, so that your kid can place the arm in it comfortably.
- Pour some brown paint inside the container, and let your child dip his hand, palm facing down, into the paint.
- Place the arm dipped in paint on a sheet of paper – make sure the fingers are apart. The arm is the trunk and the fingers become the branches. If the trunk seems incomplete, add brown paint using your fingers to make it whole. See Image 1.
- In another container, add a drop or two of fall colors – brown, yellow, orange, and red. Start adding leaves as shown in Image 2.
- Dip the tips of your fingers in these paints (separately). Paint the leaves around and on top of the branches, and your autumn tree as seen in Image 3 is ready.
4. Snowman Christmas card
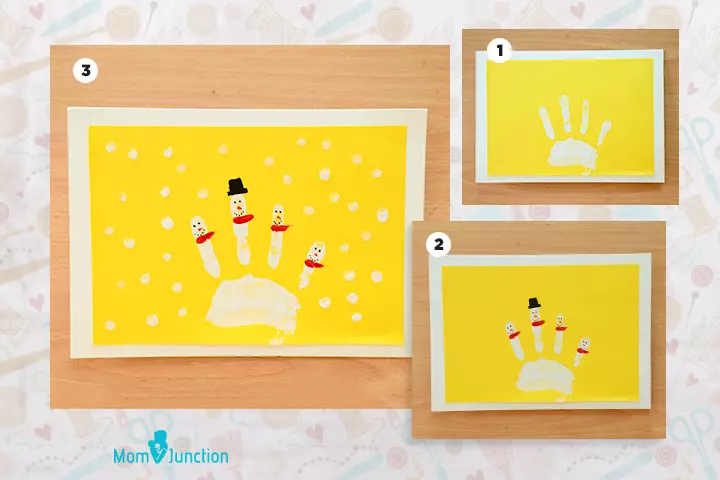
Snow is one of the best things about Christmas. So here is a Christmas card idea with not one, but four snowmen in the picture.
You will need:
- A white drawing paper and a yellow drawing paper
- Non-toxic paint – blue, red, white, and black
- A toothpick and a q-tip
How to:
- Cut the yellow drawing paper into a size slightly smaller than an A4 sheet paper, such that it fits inside the white paper.
- Paste the yellow sheet on the white paper, as seen in Image 1.
- Pour the white paint in a container and spread it a little. Let your child dip his palm and the fingers in it.
- Press the paint-dipped palm on the yellow paper as shown in Image 1. Notice that the fingers are not touching the palm.
- Use a toothpick to dip in the red, black, and blue paints to add eyes, nose, mouth, scarf, and a cap to each finger, for the snowmen.
- Use the q-tip to add small white dots around the snowmen, to indicate snowfall and your card is ready!
5. Caterpillar

If your kid has read the Hungry Caterpillar, chances are he would enjoy drawing one. Here are the steps to it.
You will need:
- A sheet of paper
- Acrylic or non-toxic colors including green, pink, blue, red, yellow, and brown
How to:
- Draw the sun, using the yellow paint, on the top left corner of the paper.
- At the bottom, create three lines using different colored paints. See Image 2.
- Dip the index finger in green color paint and make seven adjoining circles, in a slightly linear/curvy fashion, as seen in Image 3.
- Add an orange circle for the head. Use a toothpick to add eyes and antennas to the head, and legs to the rest of the body.
The hungry caterpillar is ready to eat!
6. Fingerprint freight train
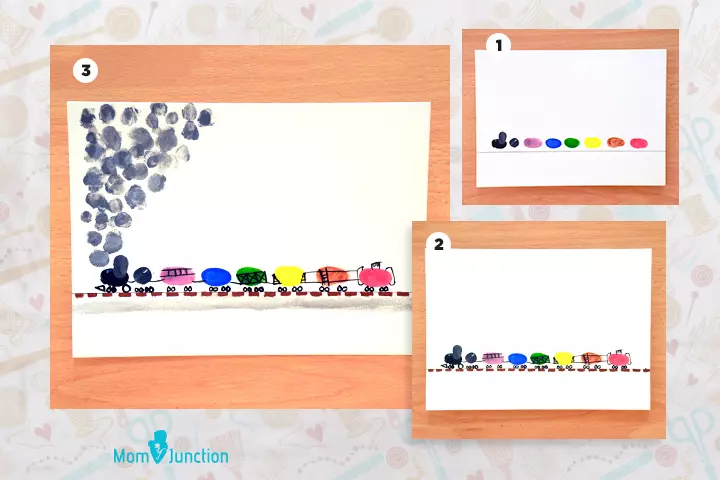
Drawing a freight train may seem difficult, considering the detailing it needs to make it real. But what about a fingerprint freight train? Well, that’s easy!
You will need:
- A sheet of paper
- Acrylic or non-toxic paints including green, pink, blue, red, yellow, and orange
- Brown and black sketch pens
- A pencil
How to:
- For this drawing, we will use the entire sheet of paper, so it is important to use the space properly.
- Start by drawing a horizontal line at the bottom using a pencil, as seen in Image 1.
- Use your fingers to paint the cars of the train in different colors. Make sure you use the same finger, in the same style, to create cars of the same size and shape.
- Draw a dashed line right below or over the penciled line for the tracks.
- Add details to the engine and the rail cars using the black sketch pen. The color pen is also used to insert the links between each car.
- Add light gray/blue dots above the engine to indicate smoke.
7. Canvas heart art

This is a simple drawing that needs a little effort on your part. It is also a great last-minute greeting, thumb painting design idea for kids.
You will need:
- A small, white canvas board with an easel stand
- Red and white paint
- A heart template
- Blue-tack
How to:
- Using the blue-tack, stick the heart template in the center of the canvas board.
- Pour the red and the white paints in the container, such that they mix up a little, giving you several shades of pink.
- Dip your fingers in the paint and make fingerprints on the canvas, around the heart template.
- Fill the space around the heart randomly with fingerprints.
- Remove the heart template, and the canvas heart art is ready.
8. Christmas tree

. Here is an innovative finger paint Christmas tree idea for kids.
You will need:
- Green paint or ink pad
- Brown sketch pen
- White drawing paper
How to:
- Start by drawing the trunk of the tree as shown in Image 1. You can draw it using a ruler or just go with freehand drawing. Color it brown.
- Add the branches to the trunk as illustrated in Image 2. Note that the tip of the trunk and the branches are all pointed.
- The last step is to add the leaves by creating prints with fingers dipped in the green paint or the green ink stamp pad.
9. Festive lights

Festive lights are perhaps the easiest of drawings in this list. You can let the kids try different types, patterns, or shapes of festive light strings. Just leave it to their imagination.
You will need:
- White drawing paper
- A palette of different colors
- A pencil and a black sketch
How to:
- Give your kid the sheet of paper and draw a festive lights string using the pencil or sketch. They can keep it linear, curved, or in any other way they want. See Image 1
- Dipping the fingers in the palette colors, add the fingerprints along the string, as shown in Image 2.
- Add different colors to make the painting colorful.
Note:
that we have drawn the string diagonally across the page, to make better use of space on the canvas.
10. Fingerprint monsters
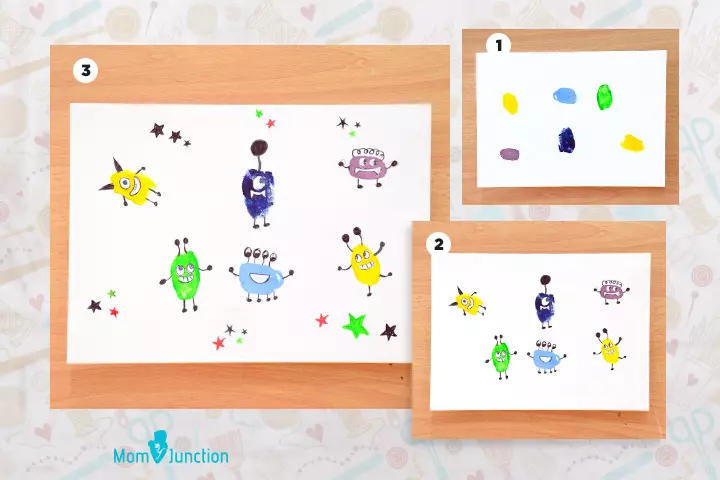
Monsters are cute when they are small. But when they are as small as your fingerprint, they are just so ah-dorable! Learn how to create them here.
You will need:
- Sheet of paper
- Different colored stamp pads or paints
- Black sketch
How to:
- Start by making different colored fingerprints, in various styles, as seen in Image 1.
- Add details such as the eyes, ears, antennae, legs, and hands to the little fingerprints using a sketch pen. This will complete the monsters.
- Add a few stars around the monsters, giving them a space monsters’ appeal.
11. Thanksgiving tree card
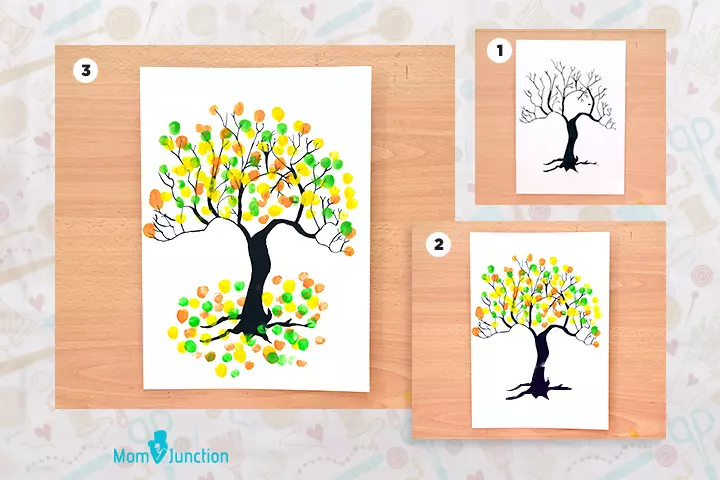
The Thanksgiving tree card is similar to the autumn tree drawing, except that it is slightly complicated and suitable for older kids.
You will need:
- White drawing paper
- Finger paints or non-toxic acrylic colors – red, orange, green, and yellow
- Pencil
How to:
- Fold the white drawing paper in half to make a card.
- Draw the tree with several sleek branches using a black sketch pen or a dark drawing pencil. An alternative would be to print a tree template on a white sheet and to work with it.
- Then dip your fingers in colors and add leaves to the branches, as shown in Image 2.
- Add foliage, by adding the fingerprints around the trunk’s bottom.
- Write a Thanksgiving message above the tree (if it is a single page) or inside the card.
12. Beautiful balloon

One of the simplest ways to draw a balloon is to use your fingerprints. In this tutorial, we will be learning how to draw an air balloon using thumb impression paintings or fingerprints.
You will need:
- White drawing paper
- Set of acrylic colors – use as many bright and cheerful colors as you want.
- Black sketch pen or drawing pencil
How to:
- Start by filling the top of the page with colorful thumb or index finger prints, as shown in the image.
- Leaving a gap of two inches, draw a square using the black sketch. The top of the square is a tad bit longer on either side. See Image 2
- Draw a smiley face on the basket.
- Draw a 3D trapezium on top of the square to complete the basket.
- Connect some of the balloons at the bottom to the basket using straight lines, as illustrated in Image 3.
- An air balloon (like the one from the movie Up!) is ready!
13. Thumbprint dandelion
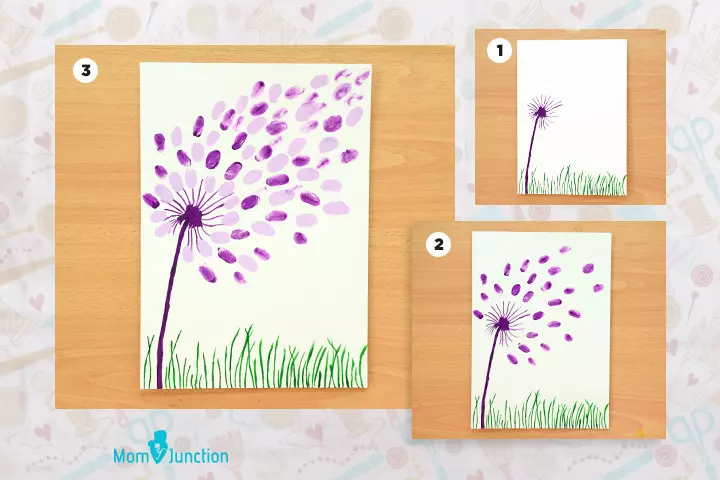
The dandelions we painted earlier were still. Now we draw how a dandelion looks when it is windy.
You will need:
- White drawing paper
- White and purple color finger paints or purple ink pad
- Green paint and a thin paintbrush
How to:
- Start with thin green lines at the bottom, for green grass.
- Draw a long, slanting line starting from the left bottom corner of the page and ending halfway through the page. Use purple color to distinguish the stem from the grass.
- Draw the head of the dandelion – add a small circle and lines coming out of it, as shown in Image 1.
- Dip the thumb in the purple ink or paint and start painting the fluff as shown in Image 2.
- Continue adding the fluff, although in a slightly lighter shade of purple, to complete the picture.
Alternatively, you may even fingerpaint a floral garden canvas, like Lauren, a mother, did with her four kids. Recalling her experience, Lauren says, “I had a lot of paint samples in the garage, different colors, so we poured a little of each into some bowls and got our fingers dirty swirling circles onto the canvas. I helped them to place the circles in a sort of random pattern, using all the different colors. Then, I went back over it and using green paint, put stems and grass on the canvas.
“The girls told me what to do, so I just followed their instructions putting the grass on the bottom and then they really wanted a sun at the top. I don’t consider myself an artist by any means, but finger painting is pretty fun! And, since the kids commissioned this work of art, I like it even more (i)!”
14. Bunch of grapes
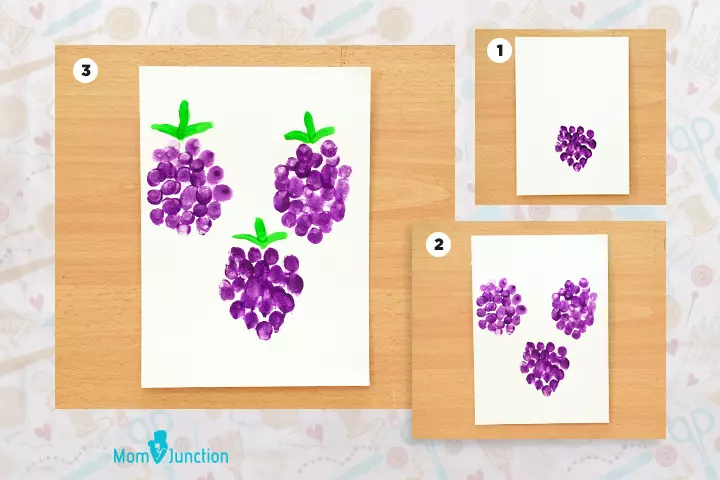
Drawing small rounded objects such as grapes are easier to draw when you use your fingers as paintbrushes. So let’s paint a bunch of grapes, shall we?
You will need:
- Purple and green acrylic paints
- White drawing paper
How to:
- Dip a finger in the purple paint and draw the first bunch of grapes as shown in Image 1.
- Add two more bunches as illustrated in Image 2. Adding grapes is easy, as all your kid needs to do is create finger or thumb impressions in the form of a bunch.
- The last step is to add the stems to the bunches. Use your index finger to draw an inverted, and slightly curved ‘T’ above the bunch of grapes.
15. Tree with birds
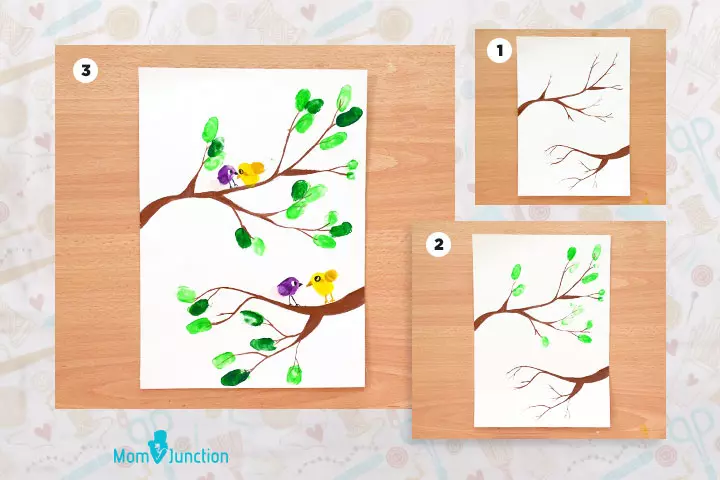
A tree and a bird? That is ‘two’ much, you may say.
Maybe. Or, maybe not when you try painting it with your fingers. Let me just say that with our easy tutorial, drawing a tree with birds is going to be fun. Take inspiration from nature and get started with the masterpiece!
You will need:
- White drawing paper
- Acrylic colors – brown, yellow, green, purple, white, and black
- Paintbrush
How to:
- Start by drawing the branches of the tree – you could begin by drawing a thick branch on either side of the page and build it by adding stems and sub-branches using a paintbrush. See Image 1.
- To the stems, add green fingerprints, as shown in Image 2.
- For the birds, dip the thumb in yellow paint and create an impression (vertically) on the branch. Dip your finger in the paint each time for each bird.
- For the smaller bird, dip the little finger in purple paint and create a horizontal impression next to the yellow bird.
- Add the eyes and beak using black and white colors. Add the legs and wings using the tips of the index fingers.
Painting this picture is fun, but it also needs a little effort on the artist’s end, making it suitable for older kids and teens.
16. Happy frogs

Frogs made of fingerprints? Absolutely! In this fun and interesting thumb painting for kids, we will learn how to draw a frog using our thumbs.
You will need:
- Green acrylic paint, brown paint
- Black sketch pen
- White drawing paper
How to:
- Pour the green ink on a styrofoam plate and spread it thin.
- Dip your thumb in the paint and create a horizontal impression on the paper. Dip it again and create another thumb impression right on top of the first one, creating a stack like structure.
- Create three such thumb stacks, leaving enough space in between to add two smaller stacks using your index finger. See Image 1
- Take brown paint in another container and dip the thumb in it. Create vertical thumb impressions as shown in Image 2.
- Use the black sketch pen to add details such as legs, eyes, and mouth for each frog, and the stems.
17. Chick and egg

Did you know that you can create a chick (bird) on paper, using just the impression of your thumb? Try this finger painting idea with your kid and see if you can.
You will need:
- White drawing paper
- Non-toxic acrylic paints – yellow, white, green, and blue
- Black sketch pen
How to:
- Dip the thumb in the yellow paint and create a vertical impression on the paper. See Image 1
- Add details to the impressions – such as the eyes, feathers, wings, tail, and legs of the chick. Also, draw the beak as shown in Image 2.
- Mix white and yellow paints to make a lighter shade for the egg.
- Use your thumb to create an inverted impression of just the top half of the thumb, on either side of the chick. See Image 2.
- Use the sketch to create the cracks visible on the egg shells on either side. Image 3
- Add grass with green fingerprints beneath the chick and clouds with blue fingerprints above the chick.
18. Fingerprint characters
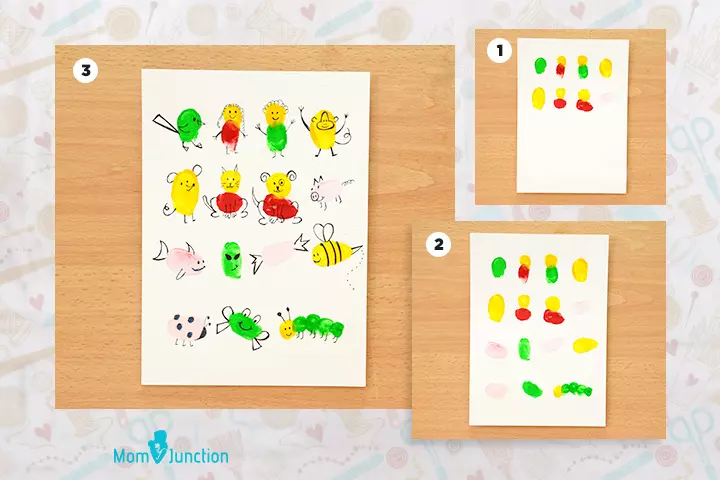
This could be a mini finger painting art project that your kids can try for school. But considering that it takes a lot of time and effort, we recommend you try this with your older kids.
You will need:
- White drawing paper
- Acrylic colors – green, yellow, red, and pink
- Black sketch pen
How to:
- On a blank paper, create impressions of the thumb and the fingers by dipping them lightly in the acrylic colors. Create impressions exactly as shown in Image 1.
- Continue filling the rest of the page with finger and thumb impressions, as illustrated in Image 2.
- The third and the last step is the most tedious – adding details to each of the thumb and finger impression silhouettes on the paper.
- Add details such as the feet, tail, hair, hands, facial features, wings, and fins or spots to each of these fingerprints to create interesting characters.
19. Reindeer art

Reindeer can go on Christmas cards or into the holiday art project at home. We used light colors, but you can use darker options such as brown if you want.
You will need:
- White drawing paper
- Acrylic paints – red, white, green, and yellow
- Black sketch pen
How to:
- Start by creating a silhouette of a reindeer using a thumb impression and an index finger print. See Image 1.
- Add details such as the legs, horns, tails, eyes, noses, and the mouths of the reindeer.
- Start adding the green patch with your fingerprints to create a grassland for the animals.
- Add a light yellow circle above the reindeer for the sun, using your hand, to complete the picture.
20. Pineapple

Drawing a pineapple can be a difficult task, considering the many small sections that the fruit has on the skin. But we make it look like a cake walk with our simple steps to finger-paint a pineapple.
You will need:
- White drawing paper
- Acrylic paints – brown, green and yellow
How to:
- Start making the body of the pineapple with yellow paint-dipped fingerprints as shown in Image 1.
- Add brown spots on the yellow fruit as seen in the second image – this gives you a vague impression of the fruit’s skin.
- Finally, paint the stem using green paint, using your fingers.
The fruit is ready to be shown off!
21. Fingerprint turkey

The final one on our list is the fingerprint turkey, and a magnificent bird, one that you cannot eat.
You will need:
- White drawing paper
- Acrylic paints – yellow, orange and purple
- Color pens
How to:
- Place the drawing paper horizontally. Create a vertical thumbprint in purple, in the center of the paper. That will be the body of the bird.
- Add orange plumes to the body – add thumb impressions in orange, surrounding the purple spot, as seen in Image 1.
- Add more plumes, this time in yellow, as shown in Image 3.
- Use the color pens to add the beak, the eyes, and legs of the bird.
- The turkey is now ready!
22. Fingerprint Christmas lights
Creating a string of Christmas tree lights using fingerprints is an adorable idea! It can be used as a decoration for handmade Christmas cards, gift tags, or any festive craft. Our step-by-step instructions will make it an even easier and fun task for you and your kid.
You will need:
- Colorful Sharpies
- Plain sheets
- Bright watercolors
How to:
- Encourage your kid to begin by using a black Sharpie to draw a line with a swirling pattern.
- Help your child add small boxes or rectangles along the line, spaced out to form the bottom part of the bulb.
- Let them dip their pointer finger in various watercolor paints, placing them just above the black squares. You can even let them create patterns or allow them to have fun coming up with random designs.
The Christmas lights are ready to sparkle on your holiday cards!
Frequently Asked Questions
1. What are the benefits of finger painting for children?
These are a few benefits of finger painting for children (1).
- Gives children a sensory experience, helping them understand the texture, color, and smell of the paint
- Develops fine motor skills, hand-eye coordination, and finger strength
- Allows children to express themselves freely through color and art
- Enhances visual understanding in children
2. Is Crayola finger paint safe for children?
Since Crayola finger paints are non-toxic and washable, they are safe for children.
3. What materials are safe for finger painting?
Materials for finger painting should always be non-toxic and washable. It’s important to check labels for safety certifications. You may also make your paints at home by combining corn or refined flour with food colors. You may also blend fruits, vegetables, turmeric, flowers, and leaves to extract their colors.
4. How can I incorporate storytelling into finger painting activities for kids?
You can start by selecting a story or a fairytale for the finger painting activity. As the child paints, let them describe the story or narrative. This makes the storytelling experience more exciting. Apart from this, you may invite your child’s friends and let each of them paint a scene from the story and complete it.
5. How can I encourage creativity and imagination during finger painting sessions?
Encourage your child to paint various designs, shapes, and patterns in this activity. When they are engaged, turn on the music. Ask them to paint in the way that music makes them feel. Additionally, ensure that you are providing the child with plenty of colors. This will give them more freedom to experiment.
6. How can I make finger painting safe and mess-free for indoor activities?
Keep washable paint on some cardstock in a resealable bag. Ensure to have a cleanable surface for finger painting. While your child is painting, do not leave them unattended. Once the child completes the activity, wash their hands. Also, wash the materials used to prevent the paint from drying.
For some individuals, drawing, painting, ceramics, or any other craft that requires the use of one’s hands can be fascinating and even soothing. Whether it’s painting thumbprint fruits and birds or other fun things like fingerprint monsters, dandelions, trees, and so on, all of the above-mentioned kids’ finger painting ideas for kids will surely allow your children to express themselves through these fun creations. Besides, art has also been shown to aid in the development of cognitive skills in studies (1). It will inspire kids to be inventive and bring their ideas to life.
Infographic: Finger Painting Ideas For Children
When given a chance to get their hands dirty and finger paint, children love it. Well, finger painting is entertaining and helps develop your child’s sensory, motor, and creative skills. So, read the following infographic to get exciting ideas for your child’s finger painting session. Illustration: Momjunction Design Team
Illustration: Creative Kids Finger Painting Ideas And Ways To Do Them

Image: Stable Diffusion/MomJunction Design Team
Let your kids explore their creativity with these four easy finger painting art projects! Perfect for kids of all ages, these fun and simple art projects will keep them entertained for hours.
Personal Experience: Source
MomJunction articles include first-hand experiences to provide you with better insights through real-life narratives. Here are the sources of personal accounts referenced in this article.
i. DIY Canvas Finger Painting.https://onlyfromscratch.blogspot.com/2013/05/diy-canvas-finger-painting.html
References
- Art – an opportunity to develop children’s skills.
http://bkc-od-media.vmhost.psu.edu/documents/HO_Art_AnOpportunity.pdf - Finger Painting.
https://www.allowah.org.au/2018/06/28/finger-painting/ - Art Education History 1930s – Personal Psu
https://eric.ed.gov/?id=EJ740307
Community Experiences
Join the conversation and become a part of our nurturing community! Share your stories, experiences, and insights to connect with fellow parents.
Read full bio of Erin DeCarlo
Read full bio of Harshita Makvana
Read full bio of Deepa Thomas
Read full bio of Vaswati Chatterjee


