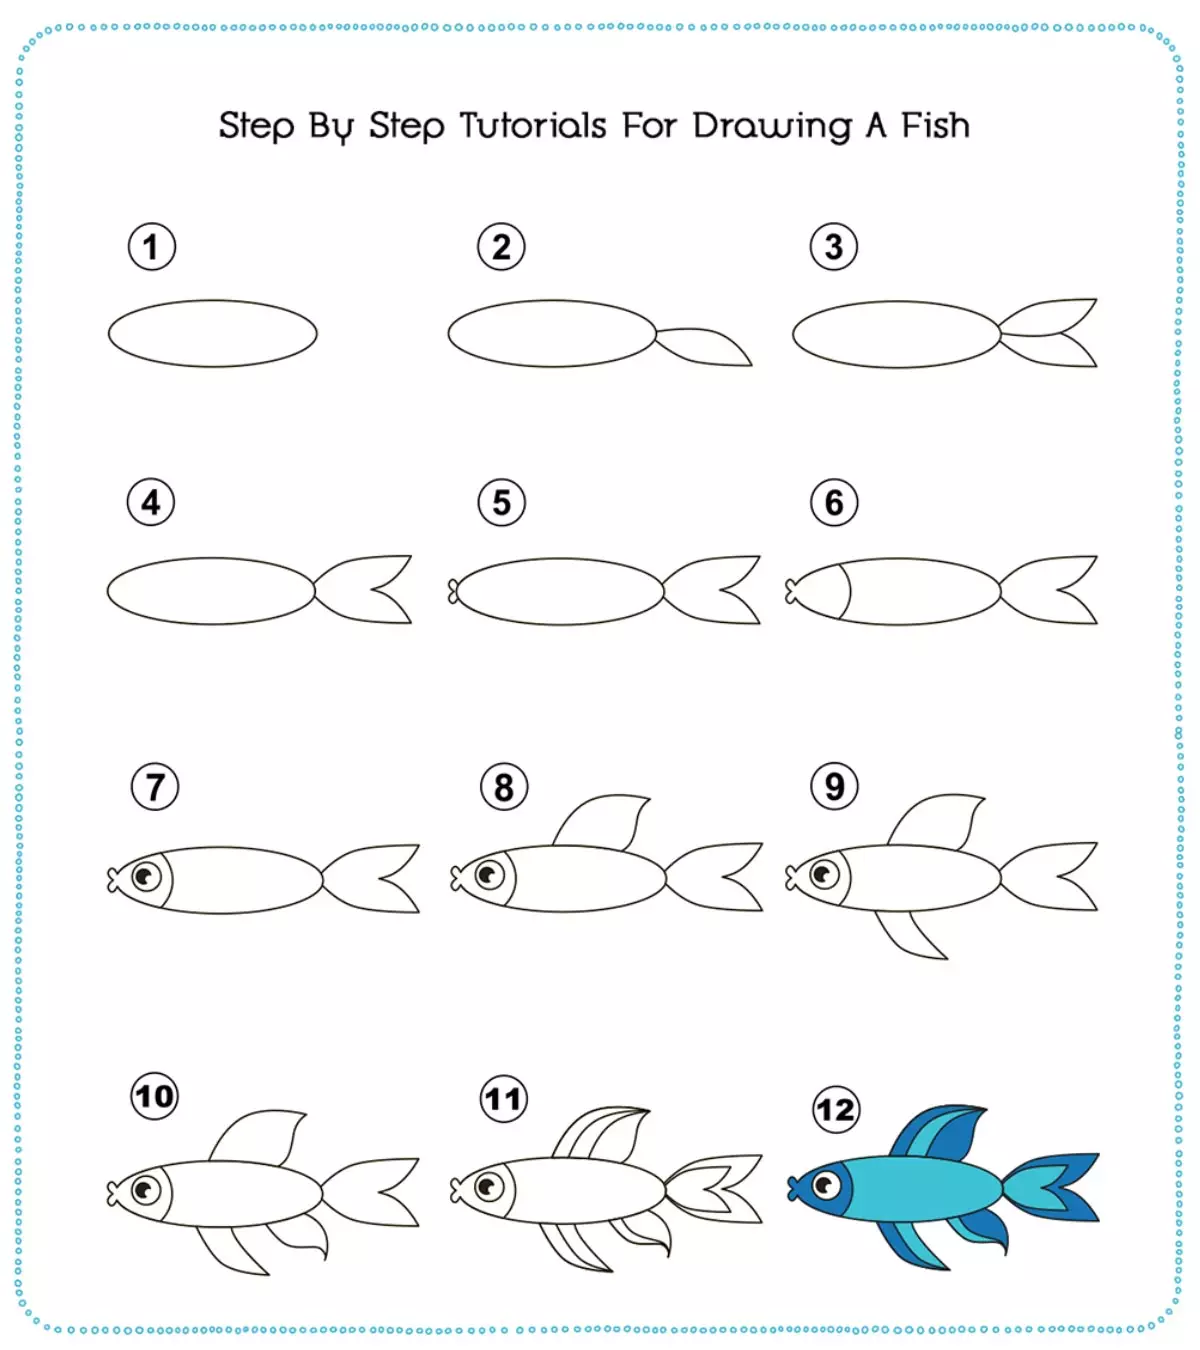
Image: ShutterStock
How to draw a fish for kids is one of the best ways to teach them about the marine world. They may find it easy to draw a fish if they can understand by learning from tutorials offering tips and tricks that are easy to understand.
In this post, we have shared an easy guide for your little ones to help them learn how to draw a fish step-by-step.
Key Pointers
- Teaching kids how to draw fish is a great way to introduce them to marine life.
- This activity teaches kids about lines and patterns; parents can also explain fish anatomy when drawing.
- Drawing is beneficial for developing kids’ fine motor skills and improves hand-eye coordination and concentration.
How to Draw A Fish In Simple Steps
Remember how you could draw a simple fish by drawing an oval or egg and extending it to form a tail? Well, drawing a fish is still as easy. And now, you can teach your children to draw different types of fish with details like scales, fins, and tails.
1. Simple Fish Drawing
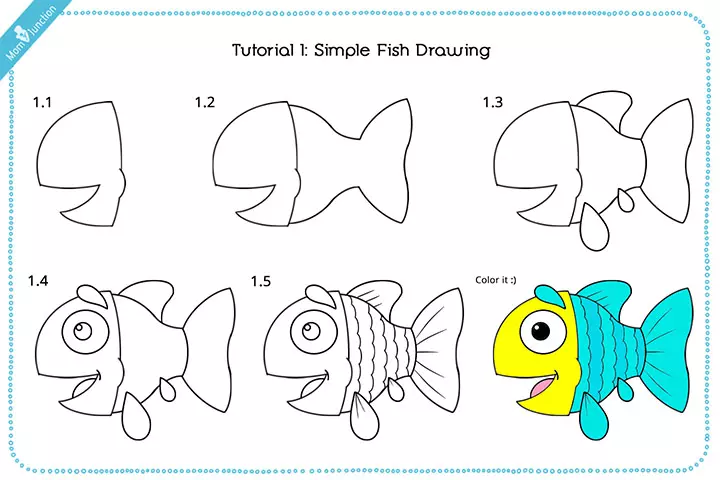
Your child may like fish, but you would not want to overwhelm him or her with intricate drawings. So, Let’s start with a simple fish drawing for kids, shall we?
You will need:
Pencil, eraser, drawing paper, colored pencils or crayons
How to draw:
- Begin by drawing the upper portion of the fish, which consists of its head, eyes, and mouth. Draw a slightly curved vertical line, with a small bump in the middle (say line A). Draw a quarter-circle starting from the top end of line A, moving towards the left. Draw a curvy triangle starting from the end of the quarter-circle.
- The tip end of the triangle should point inside, and one side should be slightly smaller than the other. This part completes the mouth. Join the bottom end of line A to the open end of the mouth. See Figure 1.1.
- Now draw the rest of the body and the tail as shown in Figure 1.2. Notice that the sides of the fish are rounded, and the body is not very long. The tail is as broad as the head and is curvy.
- Draw the fins on either side of the fish. The top will have a slightly bigger fin, shaped like a curvy triangle. Draw two small fins shaped like a droplet of water. Only one-fourth of the sharp side of the fin is into the body. Also, ensure that one fin is smaller than the other. See Figure 1.3.
- Draw a circle on the head and create a smaller round inside it for the eye. A small round inside the inner circle completes the eye. Draw a semicircle with the bottom lip as the base for the tongue. Doing this makes the fish look like it is smiling. An inverted droplet, slightly above the eye, would be for another fin. See Figure 1.4.
- Now let’s get to some detailing. Draw bumpy lines horizontally, across the fish. Finish the details by drawing thin bits of lines as shown in Figure 1.5.
- Once the simple fish drawing is complete, color it!
2. How To Draw Fish Scales
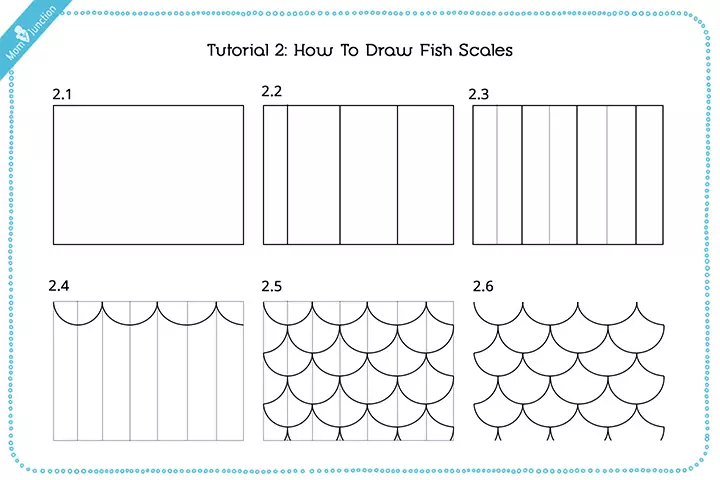
The scales are perhaps the most distinctive attribute of a fish. So, it is imperative that you get it right on paper. Here is how you can practice drawing fish scales in a box, before you try them on the fish (on paper, of course!).
You will need:
Pencil, eraser, drawing paper, colored pencils or crayons
How to draw:
- Start by drawing a rectangle on the sheet of paper.
- Draw vertical lines within the box, as shown in Figure 2.2. Observe that the lines are not equidistant.
- Use a different colored pencil to draw a few more vertical lines inside the box – Figure 2.3.
- Starting from the top, draw the first row of scales beginning from the top left corner of the rectangle. Observe that each curve covers two columns.
- Continue drawing the scales as illustrated in Figure 2.5.
- That was simple, wasn’t it?
3. Koi Fish Drawing (Coy Fish)
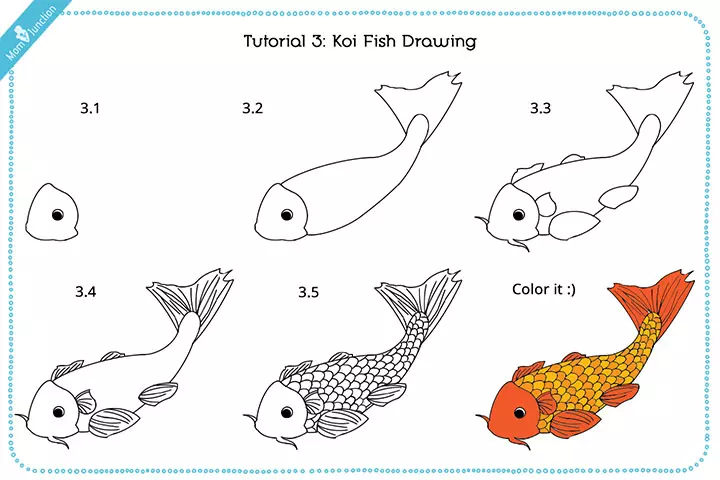
The Koi (pronounced ‘coy’) fish is native to East Asia. It is a beautiful variety of the common park and is used for decking ponds in gardens and other outdoor artificial ponds. Koi fish has complex features that your child must include in the drawing. If a pre-teen or teen is interested in learning something new, you can refer to this fish drawing step by step.
You will need:
Pencil, eraser, drawing paper, colored pencils or crayons
How to draw:
- Draw the head of the Koi first. It is curvy and has three sides, with one side longer than the other, like a triangle. The smaller side is not pointed, but flatter and half the size of the neck or longer side. Draw the eye of the fish as shown in Figure 3.1.
- Now draw the body of the Koi, as shown in Figure 3.2. Notice that the Koi has a long, slender body. Try to get the curves right, to create an image indicating the fish is in motion. The tail-end is narrow, while the other end is wider in comparison.
- Add the tail fin or caudal fin as shown in Figure 3.2. Notice that the tail is not flat or blunt, but slightly rough around the edges, and maybe even a little sharp.
- Add the fins to the sides, two on each side. Notice that we have drawn the pectoral fin (one close to the head), the pelvic fin, and the anal fin. The dorsal fin (one on top) is seen in two parts. Also add the barbels, which are sensory organs that the Koi uses to taste and smell. See Figure 3.3.
- Add details to the fins by drawing lines inside them. See Figure 3.4.
- The next step is to draw the scales on the body. Ensure that the scales do not extend to fins, head or anywhere outside the body. See Figure 3.5.
- The Koi is ready for coloring.
4. Clown Fish Drawing (Nemo Fish)
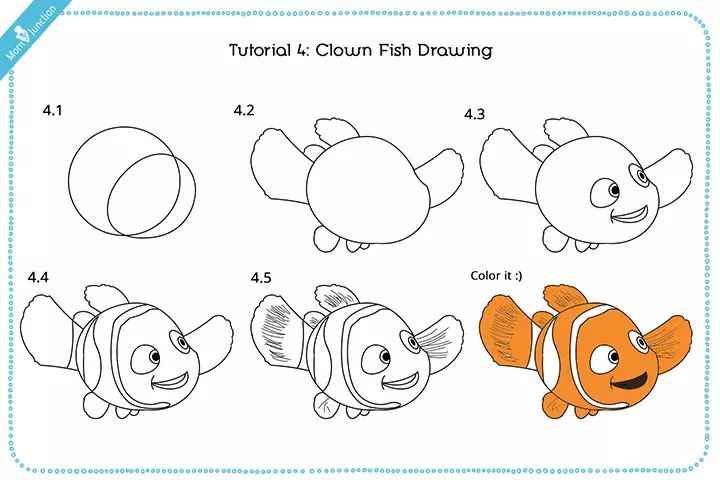
Remember little Nemo from the Disney-Pixar movie? Well, he is a clownfish. And now, you can learn to bring him to life on paper. Here is how to draw a Nemo fish step by step for kids.
You will need:
Pencil, eraser, drawing paper, colored pencils or crayons
How to draw:
- Start with the body of the fish. Draw a circle in the center, and draw another curvy sphere intersecting it, as shown in Figure 4.1.
- Erase the intersecting lines and join the circles to form a single oval, shaped almost like a mango. See Figure 4.2.
- Add the dorsal fin, caudal fin, pectoral fin, anal fin, and the pelvic fin as shown in Figure 4.2. Observe that the edges of the fins are usually rough, with a few tiny bumps here and there. Use a free hand to draw the fins, for best results.
- Add the eyes and the mouth as shown in the figure. Curve the mouth so that Nemo looks happy and smiling. See Figure 4.3.
- Draw curvy lines across the body of the fish to highlight the face and also indicate the beautiful design of the clown fish. See Figure 4.4.
- Give the fins a distinct look by drawing lines inside them, as shown in Figure 4.5.
- Color the fish orange and white to complete Nemo!
5. Cartoon Fish Drawing – How To Draw A Cute Fish
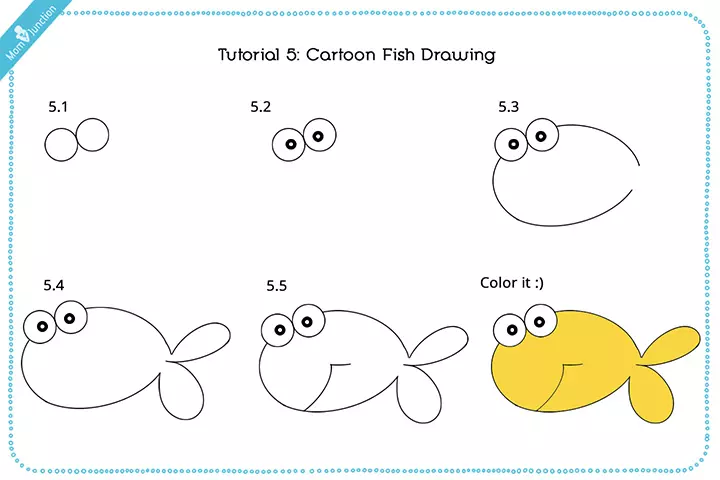
Fishes are adorable when they are cartoons. So here is a tutorial on how to draw a cute fish in simple steps.
You will need:
Pencil, eraser, drawing paper, colored pencils or crayons
How to draw:
- Start by drawing two small circles, joined at the sides. The circles should be of the same size.
- Draw a smaller circle, with thicker edges, inside each circle. Check Figure 5.2.
- Draw an egg-shaped extension starting from each eye, as shown in Figure 5.3. Be careful not to join the pointed end of the oval.
- Draw the caudal fin or the tail of the fish, which is shaped like the ears of a bunny, sideways. See Figure 5.4.
- Draw a curved line from the center upwards, and extend a tiny bit to the right, to complete the mouth. See Figure 5.5.
- The cartoon fish is ready to be colored.
 Quick Tip
6. How To Draw A Realistic Fish
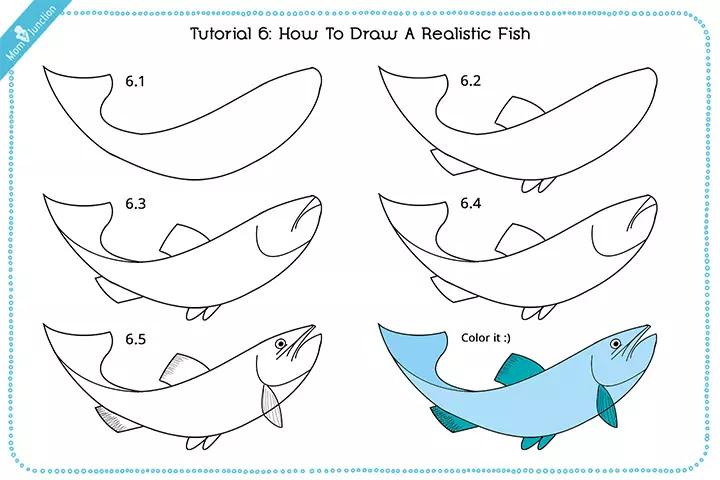
Cartoon fishes and clownfishes are amusing, but they’re not the real deal. How do you make a fish look realistic on paper? Here is that fish drawing for children.
You will need:
Pencil, eraser, drawing paper, colored pencils or crayons
How to draw:
- Start by drawing the body of the fish, which is shaped like a banana. The tail-end of the body is narrow and extends to the caudal or tail fin. Note that the curve is to indicate that the fish is slightly bent, as if swimming. See Figure 6.1.
- Draw the fins as shown in Figure 6.2.
- To add detailed features, draw lines as illustrated in figure 6.3. The double lines on the head indicate a small opening for the mouth, while the curve below the mouth indicates the gills. A cross line near the tail is to highlight the movement of the tail.
- Add the eye as shown in Figure 6.4. Start with an inclining ‘dash’ with a small circle on top of it. Then add a smaller inner circle and darken it to complete the eye. Draw a line below the eye and above the curved line (mouth) and erase the tip of the fish’s head to show the mouth open.
- Add a little more detail to the fins, by shading the edges of the fins with thin, faded lines. Do not overdo it.
- You can color the fish or just shade it with a pencil to complete it. You could also try adding scales to it, although we didn’t.
7. Drawing Of A Fish In Water
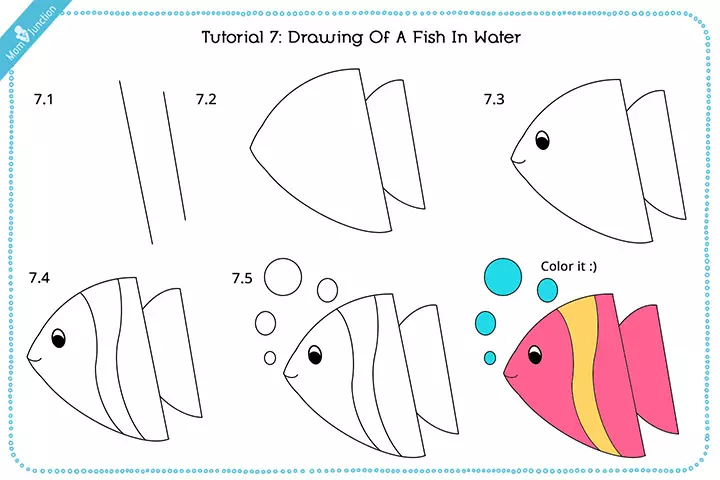
What is a fish if it is out of water? Let’s not go there! Instead, here is how to draw a fish as it is in water or sea.
You will need:
Pencil, eraser, drawing paper, colored pencils or crayons
How to draw:
- Draw a vertical line, slightly slanting from left to right. Leave a one-inch gap and draw a smaller vertical line to the right. See Figure 7.1.
- With the longer line as the base, draw a triangle, keeping the two sides equal and slightly curved. Join the two lines with small, curved lines and complete the body of the fish, as shown in Figure 7.2.
- Draw a small curved line inside, starting from the pointed end. Draw a small oval toward the sharp edge of the triangle. Shade the bottom half of it black to complete the eye. See Figure 7.3. Please remember that this is a two-dimensional image, which means that we can only see one side of the fish.
- Draw two curved lines between the two sides of the triangle, to indicate the scales on the body.
- Next, draw small circles of varying sizes, starting from the mouth and moving to the top. The bubbles indicate water. See Figure 5.5.
- Color the fish.
 Quick Tip
8. How To Draw A Fish Tank
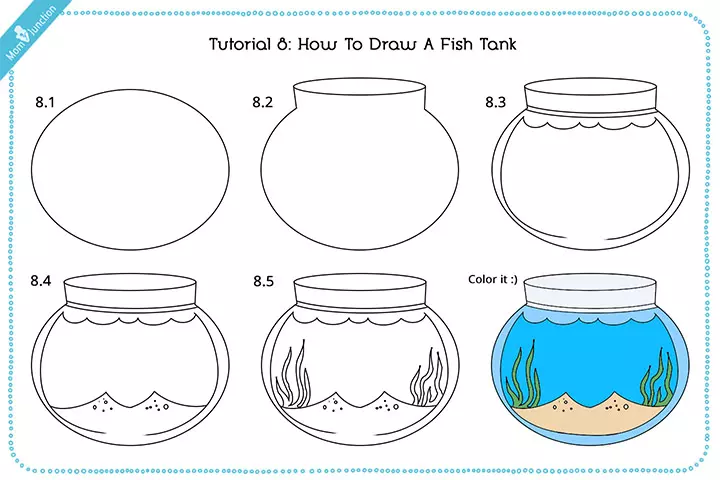
If you want a fish, you need to get a fish tank or bowl first. But for now, let’s learn how to draw a fish tank on paper!
You will need:
Pencil, eraser, drawing paper, colored pencils or crayons
How to draw:
- Draw an oval in the center.
- Erase the top line of the oval, leaving one inch on each side to make an opening. Extend the open ends at the upper part of the oval upwards by just half-an-inch. Draw a circle in between, touching the two lines. See Figure 8.2.
- Draw two lines below the circle to indicate the brim. Draw a bumpy line below that to show water or ocean. Draw a curve each on the sides, starting from each end of the rough line. See Figure 8.3.
- At the bottom of the tank, draw two small mountain-shaped structures to indicate stones or sand. Draw tiny circles in the sand to highlight the presence of oxygen. See Figure 8.4.
- Draw flame-like lines on either side, inside the pot for weeds. See Figure 8.5.
- The fish tank or bowl is ready to be colored.
9. How To Draw A Bass Fish
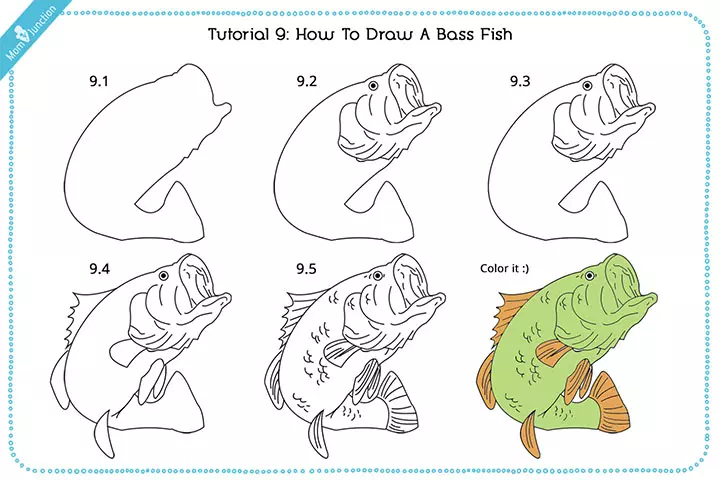
The bass is often the type of fish that people usually catch for sport or food. Here, we will learn how to draw a large-mouth bass fish, which is commonly found in North America.
You will need:
Pencil, eraser, drawing paper, colored pencils or crayons
How to draw:
- The black bass has a full mouth, which should be prominent when you draw it. So begin by drawing the outline of the fish, as shown in Figure 9.1. Notice that the mouth of the fish is open and almost one inch wide on paper.
- The second step is to add detail to create a realistic impression of the bass’s head and mouth. Draw thin lines in and around the mouth as shown in Figure 9.2. The lines are meant to show the folds of the flesh/skin inside the mouth. The lines below the head are to indicate the gills and pectoral fin.
- The next step is to add an eye by drawing a small circle with a black dot in the center of the head of the fish. Then add the dorsal fins, pelvic fin, and spiny rays to the sides, and add some detail by drawing lines near the neck. See Figure 9.3.
- Add more detail to the image with thin, closely spaced, lines on the fins as illustrated in Figure 9.4.
- Draw small, bumpy lines on the body and head to indicate scales. See that the scales are not in detail, but scarcely done. See Figure 9.5.
- You can color the fish if you want.
Frequently Asked Questions
1. What are the benefits of a fish drawing for kids?
Drawing a colorful fish can be a fun activity for children. It may help them understand how to use lines and patterns to draw various shapes. In addition, it can be an educational activity where the parents can explain the anatomy and body parts of the fish and share different facts about fish for kids.
2. What skills does drawing help develop?
Drawing helps children develop fine motor skills like grasping, scribbling, and drawing. They learn and understand the concept of cause and effect through scribbling and drawing. It also helps them understand and analyze visual parameters like size, distance, and differences in textures. Drawing also helps in improving the child’s hand-eye coordination and concentration.
3. How does drawing a fish help a child’s cognitive development?
Practicing drawing fish helps children to enhance their cognitive skills by building the ability to accurately perceive, understand and visualize a drawing and creating one based on that understanding.
4. Can drawing a fish help children learn about different colors and textures?
Yes, drawing different types of fishes can make children aware of the diverse colors of fishes. You may help them observe and understand the different textures and varieties of fishes and encourage them to color the fishes as per their imagination using paints, crayons, and colored pens.
5. How does drawing a fish foster a child’s imagination?
Drawing is a skill that boosts children’s imagination and aids in creating their representations on paper. Since drawing a fish involves simple shapes, it is easy for children to imagine fish of different shapes and textures and to draw and color them based on their distinctive creative interpretations.
When teaching about aquatic animals, it is good to teach how to draw a fish for kids. The step-by-step instructions will make it easy for children to understand how they can draw different types of fish. If you are apprehensive about how drawing a fish can help children learn the concept, you may have to rethink. Any artistic activity can attract children’s attention and help them connect with the concepts at a deeper level. Moreover, children feel a sense of achievement and pleasure when they learn to express themselves through drawing. Art is a skill that makes learning more enjoyable and interactive. So, encourage your children to draw more and boost their creativity, imagination, and patience. If your child is too young to draw properly, start their artistic journey with these fish coloring pages.
Infographic: Easy Ways To Draw Fish For Children
Drawing can be a fun activity for children of all ages, and drawing water creatures, such as fish, is popular among them. Check out the infographic below to learn some simple techniques to draw different types of fish.

Illustration: Momjunction Design Team
Illustration: How To Draw A Fish: Easy Step-By-Step Tutorial For Kids
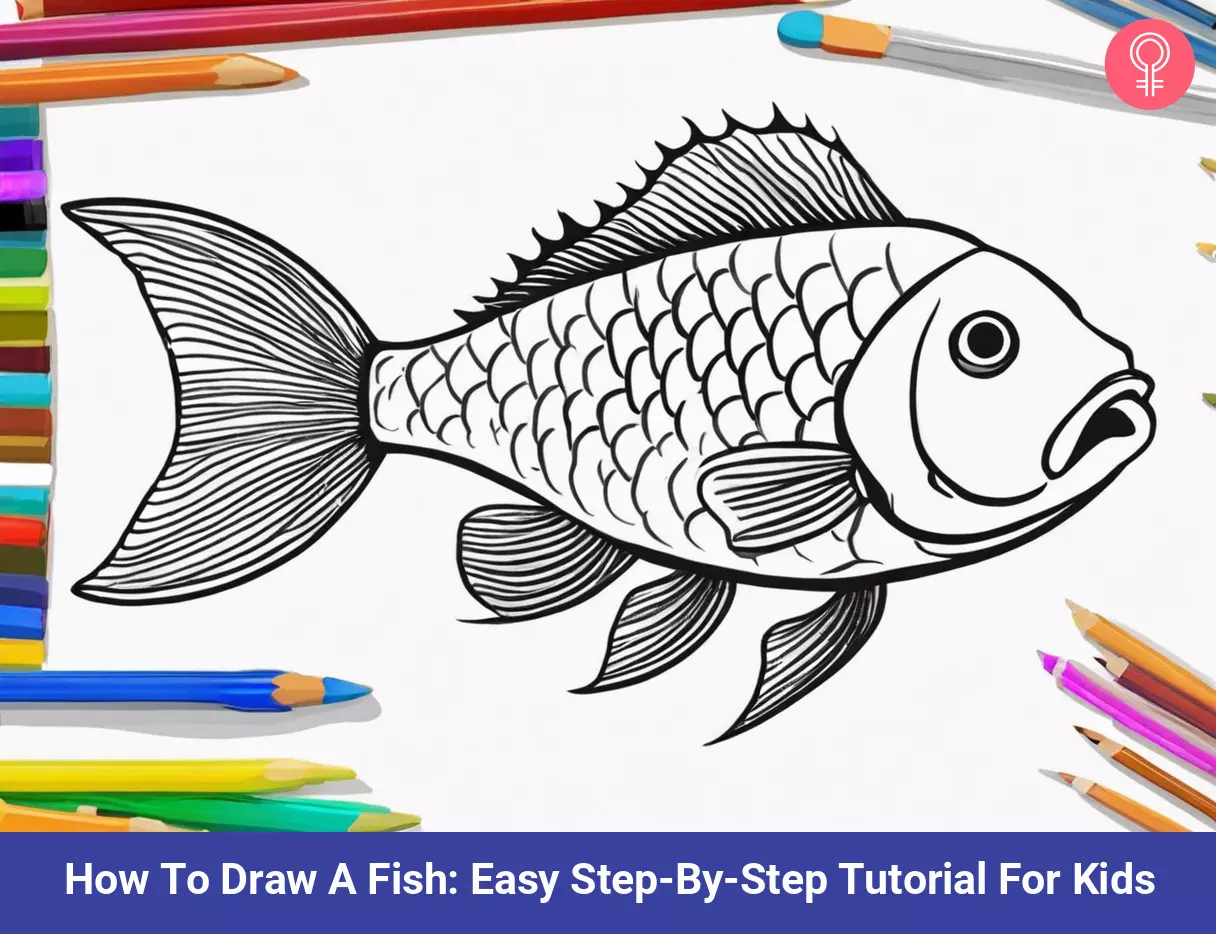
Image: Stable Diffusion/MomJunction Design Team
Learn how to draw a fish in easy steps! Follow along with this video to create your beautiful fish drawing. Perfect for beginners!
Community Experiences
Join the conversation and become a part of our nurturing community! Share your stories, experiences, and insights to connect with fellow parents.
Read full bio of Erin DeCarlo
Read full bio of Harshita Makvana
Read full bio of Deepa Thomas


